(This article is a continuation of “Preparing for an installation – Part 1”. It is recommended that you visit Part 1 located here before continuing to the information in Part 2.)
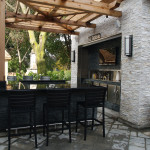
So now that you’ve created and finalized your concept sketch it’s time to prepare for the installation. There are a few important points to remember that will be addressed here. For a more detailed explanation and breakdown of the installation process visit our Stone Selex installation page here.

Stone-Selex-Protective-Hat
First and foremost always remember to wear appropriate eye and face protection when working with our stone veneer. Safety glasses will prevent debris from causing potential injury to the eye while a face mask will block out the dust that is created when the stone veneer is cut. Knee pads help protect the knees from bruising when kneeling on sharp pebbles. Working with gloves is also a good idea since they add an extra barrier to the stone and your skin.
As for materials, one needs to be armed with the proper tools in order to complete the task properly.

Stone Selex-Installation Tools
Some basic supplies you will need include; a diamond blade circular saw, a level and the safety equipment mentioned. Normal circular saw blades will dull very easily when cutting through our stone veneer so it is strongly recommended that you use a diamond saw blade. Not all stone veneer needs to be cut, however, our products vary in difficulty when it comes to installation. So some stone will need to be trimmed in order to fit properly.

Stone-Selex-Installation-Tools 2
A level will also be important to keep the stone veneers in line. Again, not all stones will need to be applied in a perfectly level manner. Natural stones don’t often appear in perfectly straight lines after all! However some of our contemporary and modern stone veneer styles require a level to achieve geometric harmony.
To learn more about applying mortar, scratch coats and laying a proper foundation visit the Stone Selex website or better yet, visit our showroom in Mississauga. There you’ll be able to see a full diorama we’ve built to help teach our customers about the installation process.
Tags: DIY Stone Veneer Installation, exterior stone veneer, faux stone veneer, installing stone veneer, interior stone veneer, manufactured stone fireplace, Manufactured Stone Veneer, Stone Fireplace, stone veneer, stone veneer design, stone veneer fireplace, stone veneer installation, stone veneer layout, Stone Veneer Mississauga, Stone Veneer Oakville
 Share On Facebook
 Tweet It